Hello! Or should we say ahlan, bonjour, hola or ciao? Why limit your website to a single language?
Creating a website in multiple languages is key to reaching more audiences. In the UAE, most people speak English, Chinese, French, Russian, and Hindi other than the national language Arabic. When you consider this factor, the question is, why wouldn’t you want to make a multilingual website?
The answer is clear- creating a multilingual website is not as easy as you think. If you’re a WordPress user, luckily, some plugins make your multilingual task easier.
This guide will walk you through creating your very own multilingual website using a plugin. This is much easier than doing it manually, but we recommend following these steps if you are a confident WordPress user.
Table of Contents
What Is a Multilingual WordPress Website?
A multilingual WordPress website is a website that presents the same content in multiple languages. It automatically redirects users to a language based on their region, or users can choose their preferred language.
There are different ways to create a multilingual website.
- You can manually translate all the content of your website into languages of your choice with the help of human translators.
- This method does not create a multilingual site, but you can use machine translations of your content using auto-translate services.
However, as of January 2019, Google Translate does not support new accounts for website translation. The other services are either not-free or not very good in quality.
Important Considerations for Translating Your WordPress Website
If you want to get all the advantages of a WordPress multilingual website, you should look for the following functionality in your translation plugin.
Click here: Why Is SEO Important for Your Business Growth | SEO Guide
Multilingual SEO
Translating your WordPress site into different languages helps you to start ranking in Google for queries in new languages. The best part is that you don’t have to create new content. You have to translate the ideas you already have into a new language.
However, if you want to optimize your website’s multilingual SEO, you’ll want to search for a plugin that has the following key functionality:
- Indexable URL structure (either a subfolder or subdomain).
- Multilingual sitemap support.
- Translatable SEO metadata.
- Hreflang support.
Applying these techniques will rank your site’s content in all languages, setting you up for success.
Click here: Why are Backups so Important for your WordPress Site?
Usability
Most people say that, when given a choice, they always visit a website in their native language, so translating your website is a great way to connect with those people and provide them with what they want. Essentially it will improve your site’s user experience.
However, you can only make this happen if you give your visitors the content they fully understand.
Look for a tool that helps you add a language switcher, at the least. Some tools automatically redirect visitors to their native language based on their IP address or browser settings, which is how many large websites like Google and Facebook handle things.
Translation Completeness
There are a lot of moving parts of your WordPress site that make it a difficult task to find a tool that translates all of these parts.
You have content like WordPress editor, widgets, text from the theme, and content from plugins that you’re using.
With all that going on, it’s easy to lose a few text strings (not translated), especially when dealing with dynamic content. It’s not good to have incomplete translated content. So, make sure your tool will let you translate everything from your WordPress site.
Choosing a WordPress Multilingual Plugin
There are several WordPress plugins available that you can use to make your website multilingual. You need to choose a plugin that will make things easier for you and your visitors.
Following are the three top WordPress multilingual plugins:
All three have the features you’ll need to make a robust multilingual website.
- They allow you to translate any post, page, and product.
- You can easily translate your plugins, themes, categories, and tags.
- You can set up SEO-friendly URLs for each language.
This guide will show step-by-step instructions on how to set up a multilingual WordPress site using the TranslatePress plugin.
How to Create a Multilingual Website in WordPress Using TranslatePress?
Click here: How to Design a Website in 2022: A Step-by-Step Guide from Idea to Launch
Set Up Your Website With a Single Language
First of all, you will need a single language WordPress website. You can move on to customization when your basic website is set up.
Regarding the design, There are plenty of themes that work fine with the translation plugin we will use. So, you don’t need to worry about how your website will look after translating.
Next, you can add all of your desired content to your brand-new website. Don’t hold back because there is nothing that you cannot translate in the next step.
Install the TranslatePress Plugin and Other Languages
The next step is to install the Tranlatepress plugin that will help you to manage all of your website translations. It comes in free and 3 premium versions with extended features available in the WordPress repository.
The free version works fine with most of the functionality. You can download and install it like any other plugin. If you want to go premium, after purchasing, you will need to download the pro plugin and then upload it to the WordPress site. You can do this by going to Plugins > Add New > Upload Plugin.
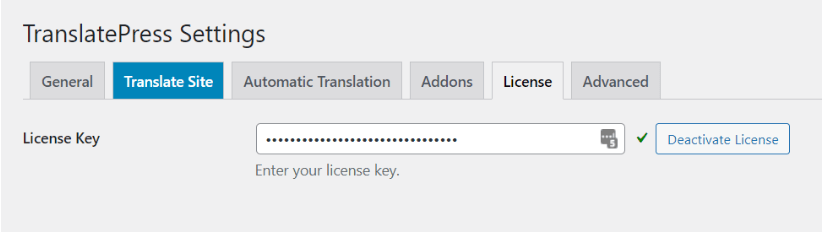
Next, you will have to activate the license from the WordPress dashboard by going to settings > TranslatePress and navigating to the License tab. Copy the license key from your account page and click on the Activate license button.
Now, navigate the General tab to set up your secondary language or languages. Using the free version lets you add one secondary language, while the pro version lets you add unlimited secondary languages.
You can set the default language of your website. Then in the “All languages” section, you can add other languages from the dropdown.
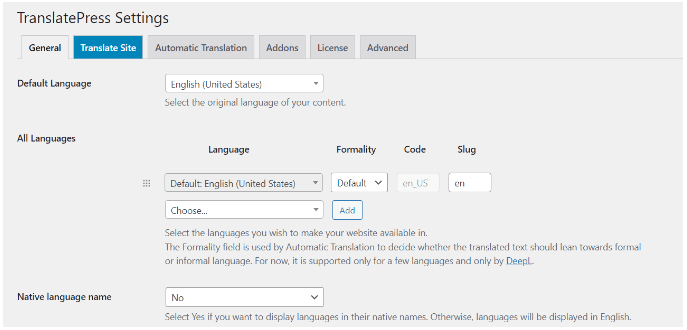
After selecting your languages, dont forget to click “Add” and “Save changes” to make it official.
Set Up Automatic Translation (Optional)
If you want to speed things up, you can enable Automatic translation, which is optional. Doing so will save you a lot of time if you are working on bigger websites and lots of content. (If you are not interested, skip straight to the next step).
Next up, let’s speed things up a little!
To enable automatic translation, navigate to the Automatic Translation tab from the settings and select “Yes” from the dropdown. This will open more setting options for the functionality.
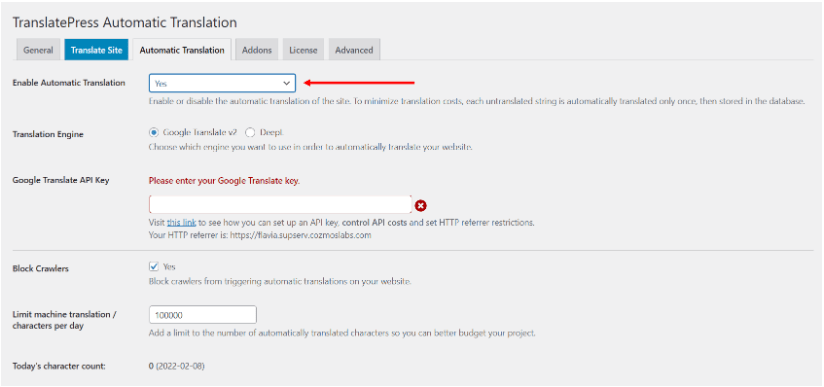
From here, you can choose your preferred translation engine. You can use the Google Translate API if you’re using the free version of the plugin or DeepL if you’re using a pro version.
No matter which service you choose, you’ll need an API key to connect your website to the desired engine. Luckily, TranslatePress has detailed documentation on this process for both Google Translate and DeepL, so feel free to check that out when you get to this step.
To stay within your budget, you can limit the number of characters you wish to translate daily. The TranslatePress plugin does not charge you for automatic translation, but your translation engine might.

Once you’re done, save your changes and go to the front end of your site. You’ll now see a floating language selector added to your site by default. From here, you can select your secondary language. There it is! Now you can see your first automatically translated page.
To translate the whole website, all you have to do is to navigate to the translated version of each page once. This action will fetch the translations from your translation engine and store them in your database. You’ll have full ownership and control over these translations.
Translate Your Content
You can manually translate your website from the visual translation editor if you haven’t enabled automatic translation. If your website is automatically translated, you can proofread everything manually and tweak anything that needs special attention.
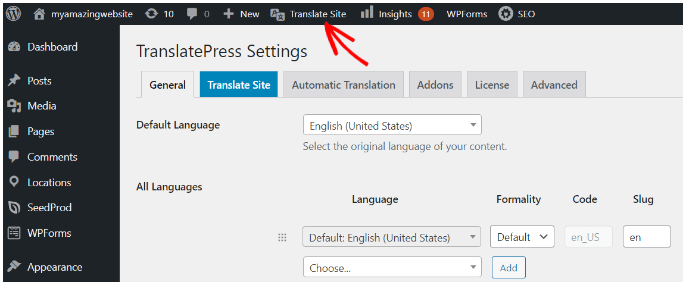
To enter the visual translation editor, go to your website from the front end while logged into your WordPress account. Then click the “Translate Page” button at your admin bar.
You’ll see a live preview of your website on the right part of your screen and a translation sidebar on the left part.
To translate, hover over a piece of content, click the pencil icon that appears, and then input your translation in the sidebar. Don’t forget to click the “Save Translation” button after each translation.
If you have already enabled automatic translation in the previous step, the translation fields will be pre-filled by the translation engine. However, you can go in and modify them in the same way we’ve shown you above.
Customize the Language Switcher
Even if your website is available in multiple languages, it is useless if visitors cannot easily access it.
TranslatePress allows you to customize the language switcher from the General tab. Navigate to Settings >> TranslatePress >> General, and scroll down to the “Language Switcher” section.
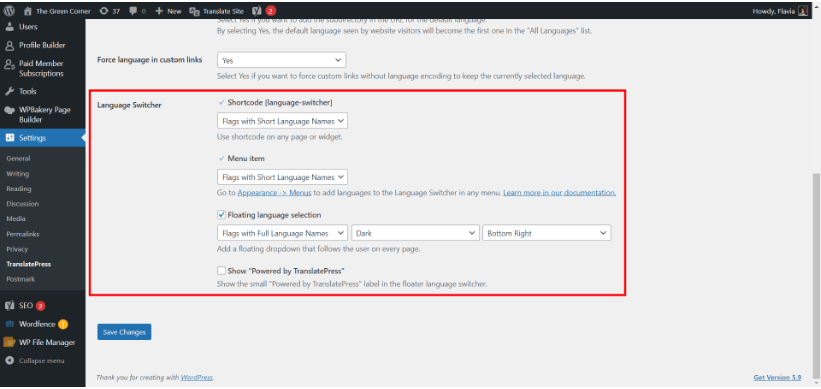
You’ll find 3 options; each lets you choose whether you want to display country flags and full or short language names.
The Shortcode language switcher allows you to place the switcher virtually anywhere on your site, be it a widget, header, footer, or some other placement. The Menu item switcher will display your chosen language options inside the menu along with other menu items. And lastly, the default option, the Floating language selector, will be placed in the corner of your website and will follow the user on every page they visit.
Click here: How to install WordPress on AEserver | A Beginner’s Guide
Get Started With the Multilingual WP Site Today
With the right WordPress plugin, creating a multilingual WordPress is not intimidating.
The TranslatePress plugin offers a non-technical way to translate your website completely. Using its visual editor, you’ll be able to search for strings, or you can click on the part of your website that you want to translate. It works with regular WordPress content, themes, and plugins.
To get started and create your multilingual WordPress site, install the plugin from WordPress.org and start translating. And for more features like SEO pack, unlimited language support, etc., you can upgrade to the pro version anytime. Lastly, Don’t forget to purchase the managed WordPress hosting from AEserver to get pre-installed WordPress and excellent features.